As many of you have seen on my other post, I have my own DIY "fusion drive" in my 2011 MacBook Pro that already runs Windows 8. However, I've decided to triple boot my system with an Arch Linux installation. For most users, this can be easily accomplished through Disk Utility, where the OS X partition can be resized in a non-destructive manner. Unfortunately, when CoreStorage volumes are created, this cannot be done. After some research into more of the verbs for diskutil, I came across some undocumented CoreStorage commands that let me do so.
The steps are relatively simple, although it can be a time consuming process. It took about 25 minutes for me to do. The basic steps are as follows:
Identify the CoreStorage logical and physical volumes you wish to alter.
Resize the logical volume size (AKA your Fusion Drive)
Resize the physical volume size (The CoreStorage Partition on the physical hard drive)
DISCLAIMER: While this did work flawless for me twice, there is always a responsibility for something to go wrong, even if you follow the directions below exactly. I am not responsible for any data loss or damage to any of your property. Play it smart and back up your system before attempting this.
To begin, I am using a program called iPartition to view the sizes of the partitions on my hard drive. This isn't the most up to date program, but for users who haven't utilized CoreStorage volumes, it is an extremely excellent partitioning program, and can even do advanced things like allowing you to shrink your Mac OS X partition and expand your Bootcamp partition non-destructively, which is impossible in Disk Utility. (Note: I am not affiliated in any way with Coriolis Systems, but I know a good piece of software when I see one.) As you can see in the image below, I have done this once to free up 3.84 GB of space. The rest is split between "Fusion Drive" and "BOOTCAMP." Notice how there are no partitions for EFI or anything else. Those supporting partitions are all CoreStorage volumes and within the logical volume of Fusion Drive.
Now, let's open up terminal and type diskutil corestorage list
It is important to note the difference between Physical volumes and Logical Volumes. In the title of each one, you see the UUID. This UUID will be unique for every single installation, so in the future commands listed here, replace mine with your corresponding UUID.
For the first command, we will be shrinking the 733 GB Logical Volume by 8 GB. To do so, I will be using the command diskutil corestorage resizeVolume 73DE2A72-4AA6-4F4F-A6BC-C6065D6D8113 725g where 725g is the new size I want the volume to be.
This command takes about 2 minutes to complete and your computer may become completely unresponsive during this process. Do not panic.
The second command will be used to shrink the 615 GB Physical CoreStorage volume on the hard drive by 8 GB. This will be done with the following command: diskutil corestorage resizeDisk FF52D05C-167B-403A-9C6D-110D02E444C3 607g
This command takes much longer(10 minutes or so for me) to do and will look frozen at 10% and 50%. Again, do not panic, and let it run its course.
That's it! Now if we check back in iPartition, you will see the free space is much larger than before! This space can be used for a Linux installation, a second Windows installation, or even an encrypted storage volume for sensitive data.
Earlier this year, adventurous tinkerers had successfully replaced their 2011 MacBook Pros' Hard Drives with Solid State Drives. It was then discovered that with a properly designed caddy, the SuperDrive can be removed and replaced with a second hard drive or SSD.
Recently, with the newest generation iMacs and Mac Minis, a new technology was released with Mac OS X 10.8.2 dubbed "Fusion Drive." Fusion drive uses Apple's Core Storage function to span a logical volume across two physical storages devices, in this case, an SSD and a HDD. The OS then will move your data in the background such that the most used data stays on the SSD, while the other data is saved to the HDD. The result is that the end user sees one "storage device" that has the massive space of a HDD, with the speed of a SSD, at a fraction of the cost. Naturally, I want to do this.
While setting up the Fusion Drive proved to be trivial, the installation of Windows 8 proved to be difficult. The ISO file has a UDF filesystem and Disk Utility will not let you restore it to a flash drive, so it must be burned to a DVD. I used a usb adaptor to connect my original internal SuperDrive, and it worked in all aspects(burning, reading, etc.) but I would get errors when trying to boot from it. Either I would get a blank screen with a blinking cursor, or(with the help of rEFIt, I could get the Windows installer to partially load before giving me a BSOD.)
This will destroy all data on both your internal hard drive as well as your new solid state drive!
As with any setup with your data spanning multiple storage devices, your chances of losing your data due to the failure of one of those devices is increased.
You have to open up your MacBook Pro to remove/replace the optical drive and the hard drive. This is a warranty-voiding move and you can seriously damage your MacBook if you do not know what you are doing!
Your mileage may vary!
I am assuming that you have some experience in installing Windows on a Mac, as well as some basic knowledge of the terminal. Don't worry, the Terminal part isn't too tough.
Overview:
Clone/Back up to external storage
Physically install SSD and HDD
Boot to USB key or Cloned HDD
Format/Partition the HDD and SSD
Create the CoreStorage volume, enabling Fusion Drive
Install/Update or Clone OS X onto new Fusion Drive
Finished(if not installing Windows via Boot Camp)
Run Boot Camp Assistant to create Windows partition
Put HDD and internal SuperDrive back in original places
Boot from Windows 8 DVD and install to BOOTCAMP partition.
Install Windows support drivers
Put HDD and SSD back into MacBook
Finished!
Detailed Steps:
1. Clone/Back up to external storage
In OS X, run Carbon Copy Cloner and back up your entire internal hard drive to an external hard drive. This may take a while depending on the amount of data you have. The Source should be your internal HDD and the Destination should be your external drive. Use "Maintain a backup(no archiving)"
Carbon Copy Cloner used for Bootable Backups
NB: You can use your Time Machine backup, but you MUST have a Mountain Lion USB recovery key to do so.
2. Physically Install SSD and HDD
Now you must tear open your MacBook and install the SSD where the current HDD is, Install the HDD in the CD Tray Caddy. I have heard of a few cases where the MacBook refuses to wake from sleep if the SSD is in the CD Tray, so take an extra 5 minutes to make that swap. I have linked the CD Tray Caddy I used above. You don't necessarily need any expensive piece of hardware for it to work. Instead of walking you through everything here, I will point you to iFixit. If you have a different MacBook than mine, follow those instructions from the same site.
If your HDD Caddy did not come with the proper mounting tab/adapter cable, you will need to move them from the SuperDrive to the Caddy.
Transfer this mounting tab and adapter cable to the new HDD Caddy
Completed HDD/SSD Transplant
3. Boot to USB key or Cloned HDD
I did this with a USB recovery key, but it can be done with the Cloned copy you made as well. Hold the alt/option key at boot and choose the correct device to boot to.
4. Format/Partition the HDD and SSD
Once up, open Disk Utility.
For both internal drives, you need to do the following:
Choose the Drive(not the volume beneath the drive) and click the Partition tab.
Choose 1 partition
Name the drive "DriveA" for the SSD or "DriveB" for the HDD
Click Options and select GUID Partition Table
Click Apply.
At this point, the drive is essentially empty. I hope you backed up!
5. Create the CoreStorage volume, enabling Fusion Drive
Now we will create the logical volume that spans both drives.
Open terminal and run:
sudo -i
Enter your password if needed. Warning: from this point on, you have root privileges. You will not be asked twice if you accidentally choose to wipe your only backup!
diskutil list
this is similar to what is shown when the command is run. Note where I highlighted
After entering that, you will see a list similar to that of the GUI version of Disk Utility. Pay attention to the drive name(top left) for the drives that contain "DriveA" and "DriveB" Mine both contain Apple_CoreStorage instead, since I already ran these commands. In my case, they were on /dev/disk0 and /dev/disk1, respectively. If your system shows them as different numbers, replace 0 and 1 with those numbers from this point on.
Create the Core Storage device using this command:
diskutil cs create "Fusion Drive" disk0 disk1
If it all works properly, You will see this line as part of the return: "Core Storage LVG UUID: XXXXXXXX-XXXX-XXXX-XXXXXXXXXXX"
Open up TextEdit or grab some pen and paper, and copy this down. Be sure it is exactly correct. You need this for the next step!
Run this command to create the volume on your new CoreStorage device. (it is all one line)
At this point, you should see a device named "Fusion Drive" in the Disk Utility App, with "Macintosh HD" as the only volume on the drive.
6. Install/Update or Clone OS X onto new Fusion Drive
If you used the USB recovery key, you can install a fresh copy of Mountain Lion now. If you used your cloned hard drive, you can run Carbon Copy Cloner to restore your backup to the new Fusion drive.
If you are doing a fresh install, follow through normally, choosing the freshly created Macintosh HD volume. If you want to recover your time machine or other backup, be sure to choose a temporary user that is not the same name as your old user account. I used "temp". When done installing, run Software Update to update everything. At this point, you can use Migration Assistant (found in /Applications/Utilities) to recover your old user account, applications, and documents.
7. Finished(if not installing Windows via Boot Camp)
Congratulations! If you do not plan on using Windows via Boot Camp, you are done! Time to go show off how fast your MacBook is!
If you plan on installing Windows, please read on. I spent about 30 hours trying to get Windows 8 to boot successfully, and it basically boils down to you needing to set up the partition, put your SuperDrive back into your macbook, along with your internal HDD, and installing that way.
8. Run Boot Camp Assistant to create Windows partition
On your newly created Fusion Drive, run Boot Camp Assistant(can be found in /Applications/Utilities).
Click continue, and check the box for downloading software as well as installing windows 7. Save the support utilities to a flash drive, make your partition as large as you want(minimum for Windows 8 is 20GB, can be up to the maximum size of your internal HDD, if you have the free space).
If Boot Camp Assistant will not let you do so, open up Disk Utilitiy, select "Fusion Drive" and then the Partition tab. Click the plus icon below, Name the partition BOOTCAMP, choose MS-DOS(FAT) as the format, and size it how you like. Click Apply. After it is successfully completed, shut down your MacBook.
9. Put HDD and internal SuperDrive back in original places
Now you must follow the reverse of step 2 to put the internal HDD and the internal SuperDrive back where it came from. It is a pain, but as of now, the only way I found to get this working.
10. Boot from Windows 8 DVD and install to BOOTCAMP partition
Boot up your Macbook, holding the alt/option key. Insert your Windows install DVD if you haven't already. Select the Windows CD icon when it appears. The Windows Installer will load, and when it does, click Install Windows, and Custom install. At this point, highlight the BOOTCAMP partition, click Advanced, and Format. After clicking OK, click install, and it will begin. The MacBook may reboot a few times. if after the install, it boots into Mac OS X, reboot, hold the alt/option key and select the Windows Hard Drive icon, not the CD.
Soon you will be setting up your copy of Windows 8.
11. Install Windows support drivers
When in Windows 8, insert your flash drive that you saved the support drivers on, and run the installer to install all the necessary drivers. The only thing not working is that when you hit the volume or brightness keys, the overlay does not appear on the screen(but the actual functions still do work).
12. Put HDD and SSD back into MacBook
When done, power down your MacBook and follow Step 2, for the last time. If everything goes together correctly, when holding alt/option at startup, you should see 2 Fusion Drive icons, as well as a Windows Icon.
All 3 Drives are Present!
13. Finished!
Congratulations, if you have made it this far, you successfully have installed an SSD, created a fusion drive, and installed Windows 8! I hope you enjoy your newly upgraded Mac, and feel free to drop me a comment!
I was recently able to test switch operation using something other than the proprietary app! I used a program called RealTerm, in which I was able to open a com port, read the hex data, and enter the 4 hex bytes I found earlier. Just as I assumed, I was able to toggle the power of the switcher!
If anybody wants to try this themselves, you can simply do it from Realterm like I did, or with an Arduino(a good alternative to those without RS-232 ports on their computers) using this code I put together below, which will toggle the power every 3 seconds.
Yesterday I recieved an HDMI switch I ordered on sale for about $20. It is the Monoprice HDMI Switcher HDX-402E. It has 4 inputs and 2 outputs. It will be used in my apartment to connect my raspberry pi and Xbox 360, as well as my roomates' PS3 and Apple TV to a projector and a TV. Another feature it has is an RS-232 port on the back, which allows for remote control via a Windows PC. Unfortunately, it is intended to only communicate with the Windows application. So I decided to see if I can make it work without the application.
The Raspberry Pi is running Raspbmc right now, and I plan on utilizing the GPIO pins in order to communicate with the HDMI switch, so that I can have the remote app for XBMC also control the HDMI input, as well as use it with scripts, such as having the input change to the Pi when it boots up.
4x2 HDMI Switch
2 Outputs, 4 Inputs, RS-232, +5V Power
So I install the software, which in itself was a pain because it came on an 8cm CD, and my computers either are slot loading or have a vertical drive. eventually I found a computer to load it with and copy it to a flash drive. For those who want to just download it, I uploaded it here.
I open up the software, and it seems to be unable to find the switch. I eventually go and check the Readme, and found the second frustration of the day! Turns out that you can't use any DB9 cable, but you need to have the Tx and Rx pins crossed.
There are cable standards for a reason...
Since my work deals with lots of networking equipment, which still uses DB9 for serial console access, I grabbed one, and made my own to test with. A nice trick for working with this is to take a knife and cut the insulation at 2 parts in the wire, 2-4 inches apart. Then slice along the wire and remove the insulation, and you get a 2-4 inch section of unexposed wire. Fold it in half, place a ziptie on it to hold it in place, and now you can quickly cut wires in the middle, and twist them onto other wires.
This cable happens to follow the coloring standards, meaning that Red and Brown are my Tx and Rx wires.
Modified DB9 cable ready to use for the HDMI switch
Now the application recognizes the switch and opens right up. It has a similar UI to the IR remote control. You click an input, then an output to link the two together. Memory and Power just toggle on and off.
Windows HDMI Switch Application
Now that I know it is functional, I can begin to find out how it works. According to the Readme, when the application is fired up, it will wait for a transmission from the switch, analyze the protocol, and if the handshake is ok, opens up the operation. If that is the case, I just need to spoof the application's handshake process, read the data from the switch, and be able to reply with the correct commands.
In Windows, the way the serial protocol works is that once a COM port is opened with an application, no other application can have access to that com port. For instance, if you open HyperTerminal and open a connection on COM1, then if you open PuTTY and try to open COM1, you will get an error. However, I did find this application called Aggsoft Advanced Serial Data Logger. This application has a "spy mode" with a special driver that lets it monitor all inbound and outbound traffic on a COM port, without restricting it from other applications. I downloaded the trial and got started. I configured it to give me raw hex values instead of trying to convert it; this way I know the data I get is correct. As soon as I fire up the switch application, I find that I get a series of 14 bytes that repeat over and over. It seems to me that either the so called "handshake" does not exist, or it is something repeated over and over. Since I don't have the ability to connect any HDMI devices right now, the only things I can do are press the memory and power button. As soon as I press them I get my output bytes for them! They are the same when pressed multiple times, indicating that there is not a different on and off command.
Log of the data when buttons are pressed in the application
So now I know the command to send power is 10 EF D5 7B
and the command for memory is 28 D7 D5 7B
Hopefully the rest of the commands are that simple.
Now, to look at the 14 byte string again...
62 01 01 01 01 01 01 01 01 00 00 01 77 09
This is repeating forever. I found that some of those bytes change when a button is pressed. On turning the power on, which selects input 1 for both A and B, I now get this string:
62 01 01 01 01 01 01 01 01 0C01 01 77 16
The highlighted bytes are the ones that differ from the first string. This seems like each byte represents a value for each property of the switch, which is probably how the application knows which ports have active inputs and what other buttons are pressed. To list the modes/options we have:
"Handshake"
Power On/Off
Active Input on Output A
Active Input on Output B
No input signal for ports 1-4
Signal not selected for ports 1-4
Active Signal path for ports 1-4
Bytes used as memory to remember current configuration as default for boot up time(this gets saved when the memory key is pressed)
So out of a 14 byte string, I assume that there will be 1 start byte, handshake, and power. Active Inputs for A and B will also take 1 byte each. I assume 4 bytes will be used to determine the status of each of the 4 ports, and another 4 bytes for storing the current configuration. I don't think there is an end byte, since the last byte changes with the power toggled on and off.
It seems like a possibility, since it totals to 13 bytes. There's only one way to find out now, and that's by testing with 4 inputs and 2 outputs, plugging them in and unplugging them, turning the devices on, and switching through the inputs.
Look out for an update as soon as I find more information!
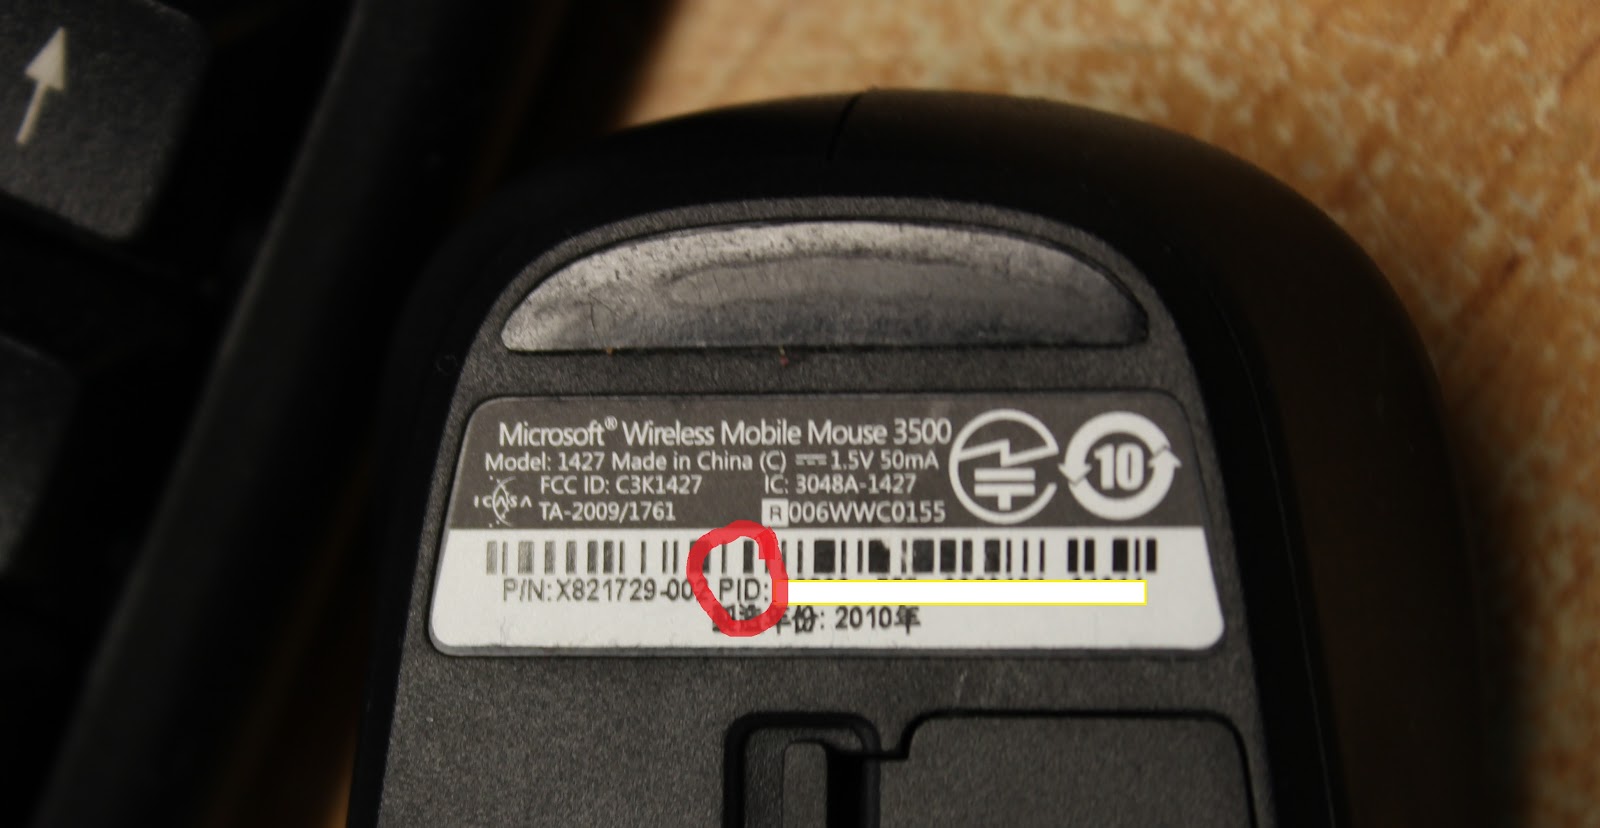
Microsoft makes some great peripheral hardware. I personally have a Microsoft Wireless Mobile Mouse 4000 and Wireless Mobile Mouse 3500. I grabbed both of them on sale, and have used them profusely for over a year now. My favorite feature is their "Nano Transceiver," which fits right in my desktop keyboard's built in hub, as well as my laptop, without sticking out to be broken off. Earlier this month, I lost my 3500's transceiver.
Microsoft Wireless Mobile Mouse 4000 and Nano Transceiver
When searching for more information about the transceivers, I found that each transceiver is paired with a wireless device from factory, and that there is no way to pair another transceiver with a device. At this point, I decided to contact Microsoft. It took some hunting, but I sent an email out to a support representative, and he is sending me out an entirely new mouse/transceiver pair! This will work for you as well, just do the following:
2. In the search box, type the name of your mouse(eg. Wireless Mobile Mouse 3500) and hit Enter
3. In the following window, enter your mouse PID. The PID is located beneath the barcode on your mouse. You need this to continue. Without it, there will be no luck in getting a new mouse.
PID location highlited
4. Choose the last option, "Don't use a professional support licence/contract (charges may apply)." Don't worry, you will not be charged.
5. Choose the E-mail option and click Continue
6. Compose your E-mail. Be as polite as possible. A little courteousness goes a long way.
7. Fill in your contact information, and be sure to check your email.
Later that day, I received an email from Support Representative Rahul, who said he could go ahead and submit a replacement order for me, once I confirmed my mailing address and PID.
The final email from The MS Hardware Technical Support Team
As always, your mileage may vary, but hopefully this gets you set off in the right direction, and saves you from ordering a new mouse.
I had recently received my new Raspberry Pi in the mail from Newark/Element 14, and like many others, I immediately downloaded Raspbmc and tried out XBMC on the RasPi. Also, like others, I have found that the RasPi can get a little toasty. While this shouldn't be too much of a problem on its own, if it were to be confined in an enclosure, or used in a car, or any other heat intensive application, problems can occur. Since I don't like to waste money, the Raspberry Pi is impossible to get, and I love a good project, I decided it was due time to do something about this heat issue.
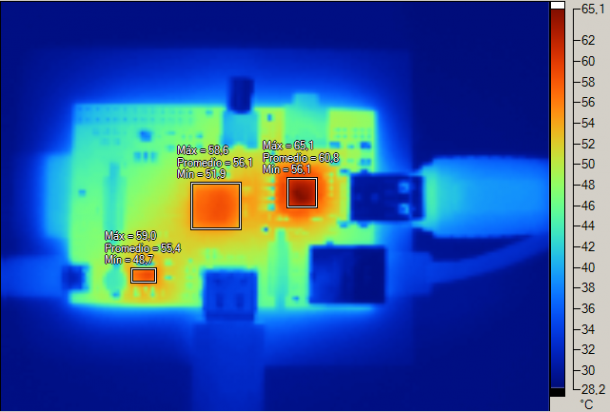
Author Remy from Geektopia used a thermal camera in order to measure the heat output of the RasPi under several conditions(The full, translated article can be read here). In the Image below, it can be seen that there are three major heat sources: The SoC(center), the USB/Ethernet controller(right), and the voltage regulator(left).
As you can see in this photo, the average temperature for the SoC while streaming video over network is about 56.1 degrees C. Not melting hot, but hot enough to cause some concern for me.
I went digging around in my parts shelves, and grabbed an old aluminum heatsink. I believe it was a chipset heatsink off an old Pentium IV based Dell box.
An old chipset heatsink seemed to be the perfect size
Luckily, it happened to be just short enough that the overall height of the RasPi is about the same. Using a digital caliper, I measured the three chips I will be covering. The SoC is 12 x 12 mm, the USB/Ethernet chip is 8.6 x 8.6 mm, and the voltage regulator is 6.5 x 5.5 mm.
Digital caliper: one of the wisest investments I have ever made.
Using this, I measured out on the heatsink for each chip, rounding up to the next closest fin. Using a band saw, each piece was cut, and sanded down to size.
Cut up with a band saw, and faced off with a bench grinder.
After getting them down to the right size, I used some thermal compound to attach them to each of the chips.
Heatsinks attached with thermal compound.
Now I have heard on the internet about using a common adhesive such as JB weld, and while silver thermal compound is about 12 times better for heat transfer, but in reality, with such a small amount of heat dissipation, the difference in temperatures will be negligible although both the JB weld and thermal compound are magnitudes better than just plain contact(air gaps, even the smallest ones, are excellent insulators). It just depends on whether or not you would want these heatsinks to be removable without destroying the RasPi.
Not any taller than the USB ports.
Lastly, it is time for a test. I fired up the RasPi and XBMC, and started streaming a 1080p movie from a Samba share. I took temperature readings a half hour into the movie to test performance.
38.8 Degrees Celcius!
As seen above, the infrared thermometer shows a temperature of 38.8 degrees Celcius. That's a difference of 17.3 degrees from the average temperature during network video playback! That much improvement will go a long way towards overall system efficiency and stability. Further implementation can be done with a 5v low profile brushless fan that came from a dead netbook. The fan could be powered directly from the GPIO pins. If it is possible to read core temperature with the SoC, then it could even be possible to utilize the GPIO with the fan in order to have the fan be intelligently controlled based on the SoC temperature, all with a simple python script.