Author Remy from Geektopia used a thermal camera in order to measure the heat output of the RasPi under several conditions(The full, translated article can be read here). In the Image below, it can be seen that there are three major heat sources: The SoC(center), the USB/Ethernet controller(right), and the voltage regulator(left).
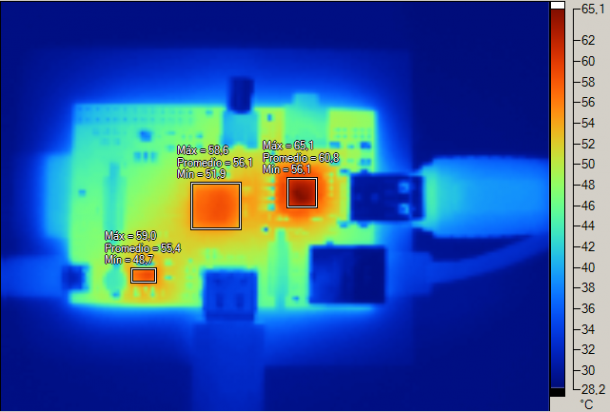 |
| Image Courtesy of Geektopia.es |
As you can see in this photo, the average temperature for the SoC while streaming video over network is about 56.1 degrees C. Not melting hot, but hot enough to cause some concern for me.
I went digging around in my parts shelves, and grabbed an old aluminum heatsink. I believe it was a chipset heatsink off an old Pentium IV based Dell box.
 |
| An old chipset heatsink seemed to be the perfect size |
Luckily, it happened to be just short enough that the overall height of the RasPi is about the same. Using a digital caliper, I measured the three chips I will be covering. The SoC is 12 x 12 mm, the USB/Ethernet chip is 8.6 x 8.6 mm, and the voltage regulator is 6.5 x 5.5 mm.
 |
| Digital caliper: one of the wisest investments I have ever made. |
Using this, I measured out on the heatsink for each chip, rounding up to the next closest fin. Using a band saw, each piece was cut, and sanded down to size.
 |
| Cut up with a band saw, and faced off with a bench grinder. |
After getting them down to the right size, I used some thermal compound to attach them to each of the chips.
 |
| Heatsinks attached with thermal compound. |
 |
| Not any taller than the USB ports. |
 |
| 38.8 Degrees Celcius! |
As seen above, the infrared thermometer shows a temperature of 38.8 degrees Celcius. That's a difference of 17.3 degrees from the average temperature during network video playback! That much improvement will go a long way towards overall system efficiency and stability. Further implementation can be done with a 5v low profile brushless fan that came from a dead netbook. The fan could be powered directly from the GPIO pins. If it is possible to read core temperature with the SoC, then it could even be possible to utilize the GPIO with the fan in order to have the fan be intelligently controlled based on the SoC temperature, all with a simple python script.